
Ice Dams 101 in Albany: Prevention, Repairs, and Insurance with anthony gucciardo
Winters in Albany and the Greater Capital Region bring picturesque snows—and a very real threat to your roof and interior: ice dams. Whether you own a 1920s Craftsman in the City of Albany, a Cape in Colonie, or a Colonial in Guilderland, understanding how ice dams form, how to stop them, and how to navigate repairs and insurance can save you thousands. This comprehensive guide brings together building-science basics, local best practices, and a practical checklist tailored to Upstate New York homeowners. For a trusted, real-estate perspective on protecting home value during winter, anthony gucciardo is a go-to resource for homeowners across the Capital Region.
What exactly is an ice dam—and why does it form?
Q: What is an ice dam?
An ice dam is a ridge of ice that forms along the eaves of your roof. It acts like a frozen gutter block, trapping meltwater behind it. That water can then seep under shingles, wetting roof sheathing, insulation, and interior walls/ceilings—leading to stains, peeling paint, warped trim, and mold.
Q: How do ice dams form on Albany roofs?
They form when uneven roof temperatures cause snow to melt higher up and refreeze at the colder eaves. The culprits are usually warm air leaking from your living space into the attic (via gaps around lights, ducts, and hatches), inadequate insulation, and poor ventilation.
Visual: How an ice dam forms (step-by-step)
- Interior heat escapes into the attic through air leaks.
- Roof deck warms above freezing, melting the underside of the snowpack.
- Meltwater flows downward to the colder eaves.
- Water refreezes at the eaves, forming a rim of ice.
- More meltwater pools behind the ice dam and pushes under shingles.
- Water leaks into the home, causing stains and damage.
Why Albany and Upstate NY homes are especially at risk
Q: What local conditions fuel ice dams?
- Freeze–thaw cycles: Capital Region winters feature frequent temperature swings above and below 32°F, ideal for repetitive melt–refreeze.
- Nor’easters and heavy snowfalls: Large roof snow loads combined with sun exposure accelerate meltwater flow.
- Older housing stock: Many pre-1970s homes lack modern air sealing and insulation, especially around knee walls and dormers.
- Architectural complexity: Valleys, skylights, and low-slope sections commonly trap snow and ice.
Visual: Typical freeze–thaw pattern (Albany, Nov–Mar)
Approximate number of days per month with both freeze and thaw conditions (ideal for ice dam formation):
Month  | Freeze–Thaw Days
Nov    | ████████  (10)
Dec    | ████████████  (15)
Jan    | ████████████████  (18)
Feb    | ██████████████  (16)
Mar    | ██████████████████  (20)
Note: These are approximate patterns to illustrate risk; specific seasons vary.
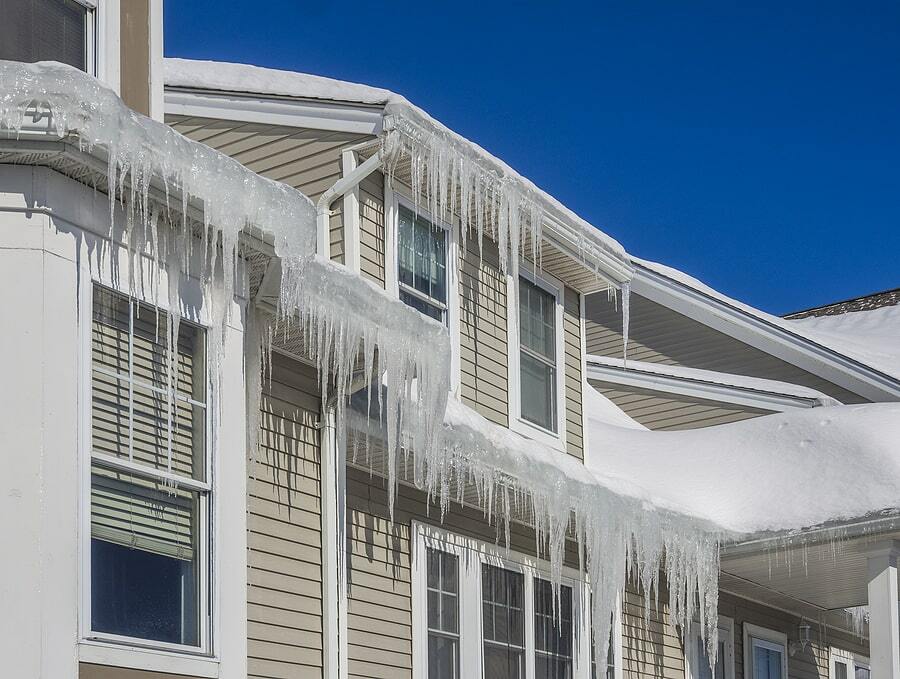
How to spot an ice dam early
Q: What are the early warning signs?
- Icicles forming along the eaves, especially above soffits and overhangs
- Ice ridges at gutters or roof edges
- Water stains on ceilings or exterior walls, particularly on top floors
- Peeling paint or bubbling plaster near outside walls
- Moldy or damp attic insulation
Quick inspection checklist after each snowfall
- Walk the perimeter: Look for unusually large icicles or thick ice at eaves.
- Check inside: Inspect top-floor ceilings and exterior wall corners for new stains.
- Peek in the attic: Look for damp insulation, frost on nails, or musty smells.
- Examine problem areas: Valleys, skylights, and additions where rooflines meet.
Prevention: A step-by-step plan for Albany homeowners
Stopping ice dams requires addressing three pillars: air sealing, insulation, and ventilation. Short-term measures help this winter, while permanent fixes pay off for decades.
Step 1: Immediate, this-winter actions (low cost, quick impact)
- Roof rake after storms: Use a telescoping roof rake from the ground to pull snow off the first 3–4 feet above the eaves. Avoid climbing ladders in winter.
- Targeted de-icing: Place calcium chloride “socks” perpendicular to the eave to create melt channels. Never use rock salt (it damages shingles and landscaping).
- Improve attic access seals: Weatherstrip attic hatches and add an insulated cover to reduce warm air leakage.
- Exhaust fans: Ensure bath and kitchen fans vent outdoors, not into the attic.
- Temporary heat cable: In persistent trouble spots, self-regulating heat cables can keep channels open. Use as a stopgap, not a permanent cure.
Step 2: Permanent fixes before next winter
Q: What upgrades solve the root cause?
- Professional air sealing: Seal gaps around can lights, plumbing vents, chimney chases, and top plates using foam and fire-rated materials where required.
- Attic insulation: Bring levels up to at least R-49 to R-60 (typical for Upstate NY). Dense-pack or blown-in insulation often delivers the best coverage.
- Balanced ventilation: Provide clear soffit intake and ridge (or gable) exhaust to keep attic temperatures consistent with outdoor air.
- Ice and water barrier: When reroofing, install an ice barrier membrane that extends beyond the interior warm-wall line (New York building code typically requires this).
- Proper flashing: Pay attention to valleys, chimneys, and skylights where water backs up most.
Cost comparison: Prevention vs. repairs in the Capital Region
| Item | Typical Albany Cost Range | Notes |
|---|---|---|
| Roof raking (per visit) | $100–$300 | Varies by roof size and accessibility |
| Heat cables (installed) | $8–$15/linear ft + labor | Best for specific trouble spots |
| Air sealing (attic) | $800–$2,500 | Highest ROI for comfort and energy savings |
| Blown-in insulation to R-49–R-60 | $1.50–$3.50/sq ft | Costs vary with depth and prep |
| Balanced ventilation upgrades | $600–$2,000 | Add/clear soffits, add ridge vent |
| Ice dam steaming (emergency) | $400–$600/hour | 2–6 hours typical depending on severity |
| Interior repairs (paint, drywall) | $500–$4,000+ | Depends on extent; mold remediation extra |
Prevention often costs less than one major ice dam claim and preserves long-term value.
What to do if you have an ice dam now
Q: What are the immediate do’s and don’ts?
- Do: Carefully rake the lower roof area to remove snow. Work from the ground.
- Do: Use calcium chloride socks to open small channels if seepage is active.
- Do: Place tarps and buckets inside to capture drips; move valuables out of harm’s way.
- Don’t: Chip ice with a hammer or chisel—you’ll damage shingles and void warranties.
- Don’t: Use rock salt—it corrodes metal and harms landscaping.
- Don’t: Use open-flame devices—extreme fire hazard.
Q: When should I call a pro?
Call a professional if water is actively entering the home, ice is thick and extensive, or access is unsafe. Reputable contractors use low-pressure steamers to safely remove ice without damaging shingles.
Emergency response checklist
- Document damage: Take photos of ice outside and any interior leaks/stains.
- Mitigate: Rake snow; place interior protection; use calcium chloride socks in limited areas.
- Call an ice-dam removal service: Ask specifically for steam removal methods.
- Contact your insurance agent: Ask about next steps and temporary repairs (keep receipts).
- Schedule a roofer and insulation/air-sealing contractor for a permanent fix.
Insurance in New York: What’s covered, what’s not
Q: Can insurance cover ice dam damage?
Most standard homeowners policies (e.g., HO-3) cover sudden and accidental damage caused by water backing up behind an ice dam—typically interior water damage to ceilings, walls, and insulation. Coverage for the actual removal of ice and for roof repairs can vary. Wear-and-tear or long-term maintenance issues are usually excluded. Always confirm with your insurer.
Coverage snapshot
| Item | Usually Covered? | Notes |
|---|---|---|
| Interior water damage (walls/ceilings) | Often Yes | Subject to deductible and policy terms |
| Insulation replacement (water-damaged) | Often Yes | If caused by covered loss |
| Roof repairs (shingles, sheathing) | Sometimes | Depends on cause; wear-and-tear excluded |
| Ice removal/steaming | Sometimes | Check endorsements; varies widely |
| Preventive upgrades (insulation/ventilation) | No | Considered maintenance or improvements |
How to file a stronger claim (step-by-step)
- Document everything: Photos and videos of exterior ice and interior damage.
- Mitigate promptly: Rake snow, contain leaks, and schedule safe removal.
- Save receipts: Temporary repairs, steaming, tarps, and drying equipment.
- Get estimates: Roofing, insulation, drywall/paint, and mold remediation if needed.
- Contact your agent: Ask what’s covered, your deductible, and whether to file a claim.
- Follow up: Keep a log of dates, conversations, and contractor visits.
Note: Filing a claim may affect premiums. Weigh the repair cost against your deductible and potential rate impacts.
DIY vs. professional help: What’s safe and what’s smart?
Q: Can I DIY ice dam removal?
Limited DIY measures like roof raking from the ground and laying calcium chloride socks are reasonable. Avoid ladders in snow/ice conditions and never chip ice. When water is entering the home or ice is extensive, hire a pro who uses steam—not high-pressure washers or chisels.
Q: Who should handle permanent fixes?
- Licensed roofer: For membrane upgrades, flashing, and ventilation improvements.
- Insulation/air sealing specialist: For attic air sealing and insulation to R-49–R-60.
- General contractor or remediator: For interior drying, repairs, and mold prevention.
Local timing: Plan upgrades for maximum impact
Q: When should I schedule permanent fixes?
- Late winter/early spring: Book evaluations and estimates while issues are fresh.
- Spring to early fall: Ideal for air sealing, insulation, and roofing in dry conditions.
- Before first snowfall: Double-check ventilation paths, attic hatch seals, and heat cables in any known trouble spots.
Q: Prepping to sell? Ice dam prevention protects value
If you plan to list in late winter or early spring, proactively addressing ice dam risks can prevent last-minute surprises during buyer inspections and appraisals. For broader selling strategy in the Capital Region, see these resources:
- Expert Tips to Sell My House Fast in Albany, NY
- Transform Your Yard: Expert Tips from Real Estate in Latham, NY
Preventive ice dam work also boosts energy efficiency and comfort—both attractive to buyers during late-winter showings.
Common Albany trouble spots—and how to fix them
Q: I have a Cape Cod with knee walls. What should I do?
Capers often have short attic spaces behind knee walls that get very warm. Air seal knee wall doors, insulate the sloped ceilings and vertical knee walls, and add baffles for ventilation from soffits to ridge. Heat cables can help in pinch at eaves, but the long-term solution is sealing and insulating the short attic spaces correctly.
Q: My home has multiple valleys and a skylight that always ices up. Tips?
Valleys and skylights concentrate meltwater. Make sure valley flashing is correct and continuous, with ice and water shield installed under the shingles extending well upslope. Ensure adequate intake at adjacent soffits and provide clear ventilation to the ridge. Consider a higher-capacity ridge vent or an additional vent in complex roof sections (per roofer guidance).
Prioritization roadmap: Where to invest first
High-ROI sequence
- Air sealing the attic (stop the heat leaks)
- Insulation to R-49–R-60 (keep heat where it belongs)
- Balanced ventilation (stabilize attic temperature)
- Roofing membrane upgrades at next reroof (ice & water barrier, flashing)
- Heat cables for chronic problem zones (as a backup)
Estimated payback
In addition to preventing damage, air sealing and insulation can cut heating costs. Many Capital Region homes see meaningful reductions in heat loss and improved comfort after these upgrades, especially in draft-prone bedrooms under the roofline.
Moisture, mold, and interior repairs
Q: What interior fixes follow an ice dam leak?
- Drying: Remove wet insulation, open up soaked cavities, and use fans/dehumidifiers.
- Sanitize: If materials were wet for more than 24–48 hours, consider antimicrobial treatments.
- Repair: Replace damaged drywall, prime with stain-blocking primer, and repaint.
- Insulation: Reinstall to proper R-value after the building envelope is dry and sealed.
Address the root cause (air sealing/ventilation) before closing up repairs to prevent repeat issues.
Quick-reference: Risk factors and fixes
| Risk Factor | Why It Matters | Priority Fix |
|---|---|---|
| Recessed lights below attic | Major heat leak warms roof deck | Replace with IC-rated sealed fixtures; air seal boxes |
| Poor soffit intake ventilation | Attic stays warm; snow melts unevenly | Clear/extend soffits; add baffles to maintain airflow |
| Insufficient attic insulation | Heat loss accelerates melt | Blown-in to R-49–R-60 |
| Skylight/valley complexity | Water channels concentrate and refreeze | Correct flashing; extend ice & water shield |
| Low-slope roof sections | Slower drainage, more ice buildup | Membrane roofing; enhanced ventilation |
Albany homeowner case playbook: A seasonal checklist
Before winter (Sept–Nov)
- Schedule attic air sealing and insulation upgrades.
- Clear soffit vents and verify ridge vent is unobstructed.
- Clean gutters so meltwater can drain freely.
- Buy a roof rake and calcium chloride (no rock salt).
During winter
- Rake lower roof after 4–6 inches of snowfall.
- Inspect for excessive icicles or ice ridges after freeze–thaw cycles.
- Lay calcium chloride socks if you see water staining or active leaks.
- Call a steamer service for severe or recurring ice dams.
Spring
- Assess any damage; repair drywall/paint and replace wet insulation.
- Book permanent fixes (air sealing/insulation/ventilation) for dry weather.
- Consider roof membrane upgrades during reroofing projects.
- Reinvest in curb appeal once repairs are complete; start with exterior cleanup and landscaping to prepare for the selling season.
FAQs: Albany ice dams, answered
Q: What causes ice dams?
Warm air escaping into the attic melts snow on the roof. The meltwater refreezes at the colder eaves, creating a dam that traps additional water. The root causes are air leaks, insufficient insulation, and inadequate ventilation.
Q: Can insurance cover the damage?
Often yes—for sudden and accidental interior water damage caused by ice dams. Coverage for roof repairs and ice removal varies by policy. Call your agent, document everything, and keep receipts for mitigation work.
Q: How can I tell if I have an ice dam?
Look for thick ice ridges at the eaves, large icicles, and interior signs such as new ceiling stains, peeling paint, or damp attic insulation.
Q: What’s the best way to prevent them?
Address the building envelope: air seal the attic, increase insulation to R-49–R-60, and ensure balanced ventilation (soffit intake plus ridge exhaust). Use roof rakes after snowfalls, and reserve heat cables for chronic trouble spots.
Q: Should I hire a professional?
Yes, for significant or active leaks, complex rooflines, or if you need safe ice removal. Pros use steamers to avoid shingle damage and can advise on insulation and ventilation upgrades that permanently solve the problem.
Q: Are heat cables a permanent solution?
No. They can help manage symptoms in specific areas but do not fix the underlying heat loss and ventilation issues. Use them strategically alongside air sealing and insulation.
Q: Do gutters cause ice dams?
Not directly. Gutters can fill with ice, but the true cause is heat loss from the house. Clean gutters help meltwater drain when temperatures rise, reducing overflow and icicle size.
Q: How thick is too thick for ice on the eaves?
If ice thickness exceeds 1–2 inches and continues growing, or you see interior leaks, call a professional for steaming to prevent further damage.
Final take: Protect your roof, budget, and resale value
Ice dams are preventable when you combine smart short-term tactics with permanent building-envelope improvements. In the Capital Region, focus on attic air sealing, proper insulation, and balanced ventilation—and then maintain your roof with safe snow management. For guidance that blends homeowner practicality with real estate savvy, explore local resources and market insights from anthony gucciardo. A winter-ready roof preserves comfort, avoids surprise repairs, and helps your home stand out whether you’re staying put or preparing to list when the snow melts.


